The most original paper gifts
DIY gifts are becoming more and more popular every year. This is not surprising, because they invested special energy and love. Moreover, it is not necessary to use any unusual materials to create them. Even plain paper is suitable for this. We picked up interesting master classes with which you can definitely make cute gifts with your own hands.


Beautiful card
Of course, first of all, you should try to make a postcard with your own hands. It can be absolutely any, depending on your preferences and topics of the upcoming event. To begin, we offer to try to make an interesting option for the New Year.

For work, we need:
- empty postcard or thick cardboard;
- needle;
- a thread;
- scissors.

To start, we fold a sheet of cardboard in half in the form of a postcard. We pierce the upper point of the figure with a needle and thread. After that, we denote the left point of the tree. The stitch length depends on your preference.

In the same way we pass the needle through the right extreme point. Please note that the triangle should be as symmetrical as possible.

We repeat the same thing until we fill the entire inner part of the triangle with such stitches. This must be done very carefully so as not to tear the cardboard.

We begin to make the next tier of the Christmas tree. To do this, pierce the paper strictly below the center of the first triangle and repeat all the previous steps.

The third tier is done on the same principle.

The result is a cute, concise postcard that everyone will definitely like.

By the birthday of a close friend or relative, it is worth making a slightly more original version. Therefore, we suggest trying to make a three-dimensional postcard.

Necessary materials:
- colored paper;
- cardboard;
- threads
- scissors;
- pencil;
- Scotch;
- glue.
To begin, we fold a sheet of cardboard in half - this will be the basis of our postcard. On colored paper, draw balls and small triangles, and then cut them out. We glue the parts together, as shown in the photo and add the thread. Repeat the same with each blank. 

On the triangles we write a congratulatory inscription and glue them to the thread. We fix the blank on the card.

We cut out small strips of paper and fold them in the form of an accordion. Glue them to several balls one by one.

Only after that we glue the balls to the card.


We collect all the threads from the balls and tie a knot. Beautiful, bright postcard is ready!

Decorative birdhouse
If you plan to make a gift to loved ones, then you probably know all the preferences. Therefore, you can safely make not only useful, but also decorative presentations. This is exactly the birdhouse, which will look great in the children's room.

Prepare the following:
- decorative cardboard and wrapping paper suitable for style;
- glue stick;
- ruler;
- scissors;
- compass;
- dry twig;
- decorative bird.

On a sheet of decorative cardboard we draw a birdhouse. It can be of any shape and height. It all depends on your imagination. But remember that the back and front walls must be the same. The same goes for the side. It is better to make the roof in a different color so that it visually stands out against the background of the birdhouse itself.

We bend the edges of all parts using a ruler. Due to this, they will be more clear. This is necessary so that the details can be well fixed among themselves.

On the facade of the birdhouse we draw a circle that will be the entrance. Carefully cut it with scissors.

We connect all the parts together with glue. Leave no less than an hour to dry.

Make a small hole in the birdhouse and insert a twig. If necessary, fix it and put a decorative bird. The original present is ready!


Minimalistic baby mobile
If you are visiting friends who have just become parents, then a mobile will be a great gift option. It can be hung not only over the crib, but simply on the wall as a decor.

Necessary materials:
- hoop;
- colored paper;
- glue;
- marker;
- scissors;
- white threads;
- ruler;
- multi-colored beads;
- hook.
Fold the sheet of paper in half, forming a triangle.

Again, fold the sheet in the form of a triangle and unfold it back.

We bend the top of the triangle, as shown in the photo.

We also bend the lower corners, as in the photo.

We fix these corners with glue.

We turn over the workpiece and draw the cat's face with a marker.

We take the second sheet of paper and fold it in half in the form of a triangle.

Fold it again in half.

We bend back and bend the top of the triangle.

We fold the lower corners of the workpiece at an angle, as in the photo.

We fix them with glue.

On the same side, draw the dog's face with a marker.

Cut the white thread and thread it through the hole in the first workpiece.

We put a few beads on the thread. This is necessary not only for decor, but also so that the workpiece hangs directly.

By the same principle, we make several more blanks in the form of animals. After that, we alternately attach them to a small hoop.


The result is a beautiful, delicate product that is definitely suitable for the decor of a children's room.

Stylish Advent Calendar
On the eve of Christmas in Western countries, it is customary to give advent calendars. Be sure that every child will have such a present.

To create it you will need:
- thick cardboard;
- sheets of paper;
- scissors;
- glue;
- decorative elements;
- sweets to fill the cells.

Sheets of paper are folded in half, then unfold and cut.

We take one sheet, fold it in half and glue the edges.

Bend the edge, as shown in the photo.

Open and fold the lower part of the workpiece.

We fix the lower part with glue and repeat the same with the rest of the workpieces.

We fill the resulting bags with various sweets, decorate at our discretion and number them.

We attach all the bags to thick cardboard. Do-it-yourself beautiful advent calendar is ready!


Paper gifts: ideas on the photo


 Paper gifts can be really beautiful and original. But for this you need to try and avoid mistakes in the creation process.
Watch the video: 21 CUTE GIFTS FOR YOUR LOVED ONES (January 2025).


-
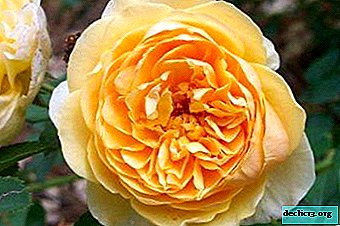
Chic Rose Golden Celebration: description, photo, care and other useful information
A rose with the talking name GOLDEN CELEBRATION (Golden Holiday) will decorate any garden and will not leave anyone indifferent. This variety requires regular maintenance, but it cannot be called moody: GOLDEN CELEBRATION pays abundant and long-lasting (throughout the summer) flowering and aroma unusual for a rose for attention to itself. ... -
-

-