The composition of the soil for pelargonium. Landing Recommendations

Pelargonium is one of the most popular indoor and garden plants. She flaunts not only in homes. Increasingly, pelargonium is planted on balconies, in flower beds and greenhouses.
With proper care, this plant pleases the eye, has a long life and has healing properties.
In the article we will talk about which soil is best suited for pelargonium, as well as the rules for planting and caring for the plant.
What is this plant?
Pelargonium is a perennial plant of the Geranium family. Has branched stems with leaves on long stalks. Blooming pelargonium has a spectacular appearance due to the large variegated or monophonic flowers of saturated pink, purple, white. In terms of duration and abundance of flowering, it has no equal.
The importance of proper soil
Many lovers of pelargonium remember very well how they used to grow it in infertile soil. At the same time, pelargonium grew and bloomed normally. Therefore, it is believed that the choice of soil for this indoor flower does not matter much.
But experienced flower growers know: one of the main tasks is to choose the right earth mixture for each plant. Soil is plant nutrition. No plant can live without soil.
How diverse the world of plants is, so diverse is the environment in which they grow, including the composition of soils. Currently, you can buy a special soil in which pelargonium will feel great and bloom beautifully, but it is better to prepare good soil on your own.
Optimal soil composition
Such a composition of soil is required:
- turf land;
- sheet earth;
- humus;
- sand;
- peat.
How to prepare the ground?
 The substrate is selected neutral or slightly acidic (pH about 6), lightweight, well permeable to air and water. It may consist of equal parts of turf, leaf land, peat, humus and sand with a small addition of charcoal.
- You can prepare the soil mixture yourself, for which you need to mix peat and perlite in a ratio of 1: 1, or peat, sand and turf in a ratio of 1: 1: 2.
- The main condition is friability. Good drainage is required. You can add coarse sand or small pebbles. It is allowed to take ordinary soil from the garden and add some baking powder to it.
Important: Sand should be well washed, without clay inclusions.
- It is advisable to add a little chopped moss or humus to the store soil. To maintain moisture, a little peat can be added to the soil.
- In order for the plant to develop favorably, it is advisable to use moderately nutritious soil. In well-fertilized soil, pelargonium can begin to grow foliage.
- Once every three months, the plant should be fed with liquid fertilizers. At the beginning of flowering and before it, fertilizer with a high phosphorus content is required.
Pelargonium does not tolerate organic fertilizing. You can cook the food yourself.
It requires:
- 1 drop of iodine;
- 1 liter of water.
You can learn more about how to feed pelargonium here.
In winter, top dressing is not needed.
 The substrate is selected neutral or slightly acidic (pH about 6), lightweight, well permeable to air and water. It may consist of equal parts of turf, leaf land, peat, humus and sand with a small addition of charcoal.
We also recommend watching a video on how to properly feed pelargonium with iodine:
What kind of pot is needed?
Pelargonium is quite demanding on the features of the flowerpot. The appearance of this plant directly depends on the correct choice of capacity.
What you should pay attention to:
- Material. For any indoor plant, the best is a ceramic pot. It retains moisture well and protects against overheating.
If pelargonium grew for a long time in a plastic pot and felt great in it, it is advisable to transplant it into a plastic one (how to transplant and root pelargonium?). At the same time, the previous growing conditions will be preserved. However, there is a minus - in a plastic pot, the soil dries quickly.
The material of the pot is not critical and can be changed. In this case, it must be remembered that both the watering regime and the care regime as a whole will change.
- Optimum size for the pot.
- Pelargonium can be grown at home in a pot and box. If boxes are used, the distance between the bushes should be at least 20 centimeters.
- The selection of capacity depends on the size of the root system of the seedling. Even for adult plants, a flowerpot is usually required, the diameter of which does not exceed 15 cm.
- The diameter of the new pot should be two to three centimeters larger than the diameter of the old.
Important: Pelargonium blooms only when the roots in the flowerpot become crowded. If the plant is transplanted from a small pot to a large one, then the flowers will not appear until the roots fill the entire volume.
More information about why pelargonium does not bloom can be found here.
- The height of the pot should be about 12-15 cm.
Be sure to have a drain hole on the bottom of the pot.
Landing process
 When propagated by cuttings, the roots of shoots of pelargonium begin to grow already in the third or fourth week. Then the shoots are transplanted one at a time to a permanent residence. So that they bloomed faster, they do not need to be cut.
When propagated by seeds, the emerged sprouts dive into separate small containers when two or three leaflets appear on them (for more details on the process of propagation of pelargonium, see here).
As pelargonium grows, another transplant into larger pots may be required.
Every year in March, young pelargonium plants are transplanted into fresh land. At the same time, they are severely cut off, leaving 2-5 buds on each shoot. Due to this, subsequently obtained low lush, abundantly flowering specimens.
Overgrown pelargonium is transplanted only if necessary - when the pot becomes small. After the threat of frost ends, pelargonium can be taken outside or planted in flower beds (5 plants per meter) in the soil with the same characteristics as when grown at home.
Adult plants of pelargonium are finicky about transplantation, so it is better not to disturb them without special need.
The transplant procedure is as follows:
- Prepare drainage, soil and pot.
- Lay a 3 cm thick drainage layer on the bottom of the pot. As a drainage, brick crumb, finely chopped polystyrene or expanded clay of a small fraction can be used.
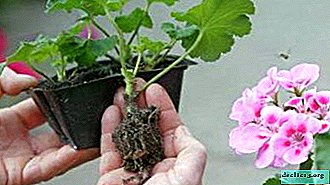
- Carefully remove the plant from the old pot without shaking the soil from the roots.
- If the pot does not change, it must be treated with bleach. Pour bleach into a container and leave for a while, and then rinse well with water.
- After the plant has been seized, it is recommended to carefully examine the root system for rot and disease. If there are damaged areas, then they must be removed with scissors.
- Put the plant by transshipment in a new or processed old pot without breaking the earthen coma.
- Sprinkle the roots with new soil until the flowerpot is full and slightly compact.
- To water.
What to do after transplantation?
- Pelargonium needs to be watered and put in a shaded place for one week. Make sure that there is no overflow.
- After 7 days, the plant must be installed in a warm and well-lit place. Pelargonium is very fond of bright and diffused light.
- 2-3 months after transplantation, the plant is fed with superphosphate, which stimulates flowering.
Pelargonium care is not very difficult. When breeding it is necessary to form the correct soil, pick up a small flowerpot, and be careful in the process of planting. Observing the basic rules, you can get beautiful plants that will delight with spectacular flowers and a pleasant aroma.
Watch the video: How I Make a Succulent Arrangement! . Garden Answer (May 2024).


-
Create a stylish interior using a modern reception of designers - companion wallpapers
When wondering which wallpaper is better to choose, it is necessary to take into account a number of important points: elegant wallpapers will always create a festive atmosphere, presenting a separate decorative element of the interior, while monophonic wallpapers create a wonderful background for emphasizing beautiful furniture. Consider the third way to design the premises - this is a companion wallpaper. ... -

-
-