Rules for the propagation of orchids with roots at home. Aftercare Tips

Orchid is a beautiful, but very moody plant. But, despite the fact that it requires a lot of attention, there are many who wish not only to purchase such a flower in the store, but also to breed it at home.
There are three ways to breed orchids: vegetative, generative, cloning. The last method is possible only in laboratory conditions, and the first two are actively used by gardeners and amateurs. Practice shows that the most reliable is the vegetative method (root).
Rules
In order to propagate an orchid, it is necessary to observe some rules:
- You can not use young flowers - this can not only not give a result, but also destroy the already grown plant.
- All tools must be disinfected (potassium permanganate, hydrogen peroxide).
- Respect for fragile roots.
- Processing of plant sections with carbon powder (otherwise you can bring the infection).
- Strict adherence to heat and light regimes for the transplanted appendix for a month.
- Exclude top dressing and watering the plant, replacing it with spraying.
Choosing the right breeding specimen
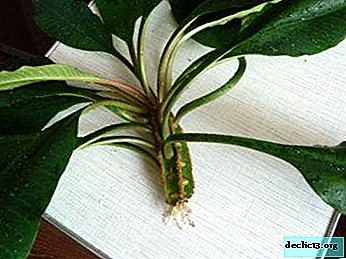
 The roots of the flower should be healthy and have several pseudobulbs on each root selected for propagation. The more such pseudobulbs will be, the more successful the division will be. Orchid aerial roots are also suitable for breeding.. Young ones have a juicy green color, and adults become silver.
For breeding, you need to take a formed, strong spine - just this one has a sufficient amount of vitality for breeding. In this case, flower health is also an important aspect. For these methods, sympodial orchid species that have a thickening of the stem with sleeping buds are suitable.
You need to propagate the orchid in the spring - it is at this time of year that the flower wakes up, the phase of active growth begins in it. The plant accumulates many useful substances in itself and will more easily tolerate the separation. You can not divide the orchid during the flowering period, and after she drops the flowers, the peduncle should be removed before propagation (is it possible to propagate the orchid through the peduncle?). This is done with a sharp, disinfected knife, after which the cut is sprinkled with charcoal.
ATTENTION: After flowering, the plant needs to be given 1-2 weeks of rest, and only after that it is possible to start reproduction.Step-by-step instruction
Propagating orchids with roots is considered one of the easiest ways., but here you should be careful, follow certain rules. Namely:
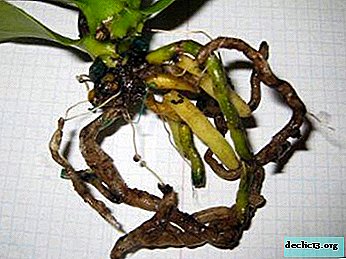
- To begin with, the flower should be carefully removed from the pot and the roots should be cleaned of excess substrate. To do this, slightly shake the plant - all the excess will disappear without difficulty.
- After cleaning, place the orchid roots in warm water (+ 30-35 degrees) for 20-30 minutes.
- A sharp, sanitized knife cuts the root. It must be remembered that only those that have a minimum of 2-3 pseudobulbs can be used.
- The places of cuts must be sprinkled with cinnamon or charcoal (crushed activated carbon is also suitable).
- Leave for a couple of hours, giving the roots a little dry.
- All divided roots are planted in different pots with appropriate soil.
After these manipulations, it is necessary to closely monitor the plants, to spray in a timely manner several times a day until the first strong roots or leaves appear. This will be a signal that the flower has taken root and began to develop. Two to three days after the transplant, you can begin to water the orchid in the usual way. Watering depends on the type of flower and time of year, but as a rule they do it 1-3 times a week in the summer, and during dormancy 1-2 times a month.
Watch a video about orchid propagation by roots:
Propagation method of aerial processes
If the orchid has many silver aerial roots, then you can use the second method of breeding.
 Carefully inspect the flower and select one strong spine.
- Carefully place the selected root on a layer of sphagnum (special moss) in an adjacent pot. This layer must be pre-moistened in order for the plant to take root.
- A sharp knife makes a small incision. Remember to disinfect the instrument.
- The resulting wound is smeared with cytokinin paste to stimulate the growth of children.
- After the appendix appears at the site of the cut, you must wait until it gives strong roots. With proper care, this will happen in 20-25 days.
- Next, cut the baby from the main plant. To do this, cut a single root at a distance of about 1 cm from a young plant. All sections should be sprinkled with charcoal or cinnamon.
- Now the sprout can be planted in a separate pot. It must be remembered that the diameter of the pot for a new flower should be 2-3 mm less than that of an adult plant.
 Carefully inspect the flower and select one strong spine.
The greenhouse will help accelerate growth. To create it, use an ordinary plastic glass (it is cut to the side), which cover layers. Moss needs regular hydration even in greenhouses.
TIP: Average humidity and temperature of 29-22 degrees are ideal for a young flower. In such conditions, the plant will feel most comfortable, which will favorably affect its growth.These methods are suitable for those orchids that have grown and become crowded in the pot. The need to divide or transplant the plant into a larger pot will be indicated by the appearance of young pseudobulbs over the soil.
For young layering, it is better to purchase soil in a store, while for adults you can prepare it yourself.
What difficulties and problems may arise after?
It is very important that a comfortable thermal and light regime is observed in the room, otherwise the young plant may die. If the room is cool or excessively dry, it’s worth building a small greenhouse. the following rules should be observed:
 You can not feed the planted sprout - it must go through a period of adaptation and take root.
- If the original flower instance is often sick, then it is better to refuse reproduction, otherwise it may die.
- Also, children can die with insufficient spraying (it stimulates the appearance of roots).
 You can not feed the planted sprout - it must go through a period of adaptation and take root.
A beginner grower may not be able to reproduce an orchid at home the first time due to insufficient experience in breeding these capricious plants. Do not despair - it is necessary to review the conditions created for the process, perhaps one of them was not observed, which led to the death.
Further care of the plant at home
When the plant has taken root, then there is no need for additional manipulations. It requires the same care as any other adult orchid.
Irrigation mode, humidity, light interval - subject to all necessary conditions, the flower will actively grow and grow stronger. Particular attention should be paid to watering - orchid does not like excessively moist soil (the roots begin to rot), but drought also affects it badly.
IMPORTANT: It is recommended to pour water into the pan so that the plant itself takes as much as it needs. Some types of orchids require frequent spraying (up to three times a day), for example, Wanda.Do not forget about fertilizing - this will determine the abundance of flowering and optimal growth.
Conclusion
To plant an orchid at home is not as difficult as it might seem at first glance. Attentiveness, accuracy - that's all that is required for a successful division of the plant.
With proper propagation, the orchid will delight you with its magnificent flowers for many years to come. Good luck with floriculture!
Watch the video: How to care for orchids after blooms fall (November 2024).


-
It is easy and clear about milkweed breeding at home and outdoor cultivation
The diversity of milkweed species is difficult to imagine for an inexperienced look: more than 1,500 samples growing in different parts of our planet - from Africa to central Russia. Trees, shrubs, annual and perennial grasses - for a detailed description of each, you will need more than one foot of paper and not one hour of time. ... -

-

-