How to form a beautiful crown from pelargonium: we learn how to pinch it correctly at home
Pelargonium is a favorite flower of grandmothers, familiar to everyone since childhood. Pelargonium has been grown as a houseplant since ancient times. In Europe, it appeared at the end of the 17th century. An unpretentious flower that easily survived the winter on a cold window was in every house and, with the first spring rays of the sun, delighted the owners with lush caps of bright colors.
Pelargonium is a very beautiful flower. Its bright foliage and flowers are very charming. But in order to achieve a spectacular appearance of the flower, it is important to know how to form a bush. In this article, we will reveal ways to properly form a plant, and give tips on the basic mistakes made by gardeners.
Plant description
Pelargonium is a representative of the genus of the Geranium family. This is a perennial indoor flower, grassy or semi-shrub type. Leaflets can be simple in shape or palmately dissected. Flowers of various colors combined in a kind of umbrellas. The flowering period is long. Unpretentious enough to care for. Widely distributed in the Russian Federation, in terms of cultivation at home.
Why do pruning?
 Pruning is the removal of a certain part of the large stems of a plant. This procedure is quite a cardinal way of forming the crown of the bush. It can be applied only to adult plants. Pruning is done to get rid of old and elongated stems. After the winter period, due to a decrease in the level of illumination, pelargoniums are usually elongated. The flower loses its shape and bushiness.
Thanks to pruning, the plant again acquires a compact attractive appearance, symmetrical in shape. In place of old twigs and leaves, others soon appear - young and juicy. Moreover, pruning will give new planting material. Cuttings not affected by the disease can be used as cuttings. Root them, and you can safely plant them (for more details about the propagation of pelargonium by cuttings, see here).
What is pinching?
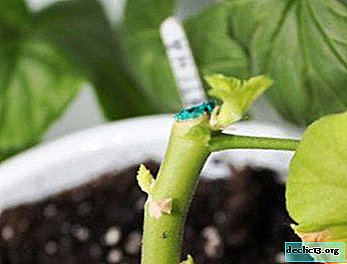
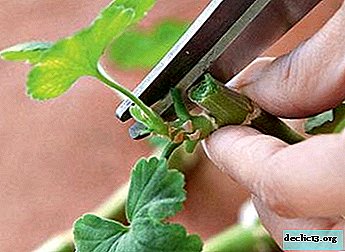
Pinching is the removal of the tips of the stems - growth points. It is a more gentle way to model a plant.
REFERENCE! Pinching is done in order to increase the bushiness of the shoots. In the place where the plant was pinched, several young shoots appear. The bush becomes wider due to increased growth of side shoots.It should be noted that using this method, you will not only increase the branching in the pot, but also increase the amount of flowers for the future.
Basic Rules
At first glance, these manipulations are simple to perform. However, it is not. There are several rules that must be strictly observed. So, how to prune a plant?
- Sterility. Before the procedure, be sure to wipe with alcohol the object with which you will cut the plant and wash your hands with soap. Compliance with this rule minimizes the risk of infection of a flower with any disease.
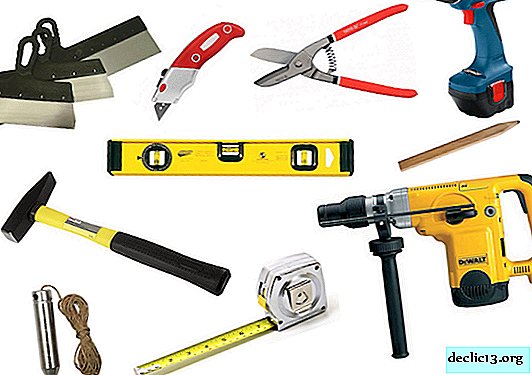
 The right tools. Use only sharp equipment. A blade and a clerical knife are best suited.
- Disinfection. After the cut, the wounded site must be treated with one of the following drugs: brilliant green, crushed coal, alcohol, fungicide. In addition to disinfection, this treatment will also allow the cut site to heal faster, not dry out and not spoil the appearance of the plant.
- Accounting for the type of pelargonium. Not all varieties of this plant are trimmed and pinched equally. So, for example, royal pelargoniums need to be cut off in several stages. Strong pruning, like zonal pelargoniums, will damage the royal one and greatly weaken it.
- Rational use of recycled material. Do not rush to throw away the cut stems. Healthy sprouts can be used as cuttings.
 The right tools. Use only sharp equipment. A blade and a clerical knife are best suited.
How is it done when growing a flower from seeds?
Some gardeners prefer to propagate pelargonium using seeds. However, this method requires special attention when pinching seedlings. When the sprouts get stronger, and more than 8 leaves (excluding the cotyledon) will be counted on their stem, then you can safely pinch. Thus, you need to pinch the plant over 6-8 leaves. In this case, only axillary shoots are left that are located below the upper pair of leaves.
IMPORTANT! Young plants grown from seeds are not pruned.When to carry out the procedure?
The optimal time for pinching pelargonium is the end of winter - the beginning of spring, i.e. February March. During this period, the resting time of the plant ends, and it prepares for a new fertile season. However, to adjust the volume of foliage and flowering, pinching is not prohibited, both in spring and summer. Pinching helps increase flowering, but pushes the appearance of the buds a few weeks further.
Pinching Instructions:
- Visually assess the condition of the plant after winter. A pinch is enough for him, or he still needs to be cut.
- Disinfect hands and equipment.
 Pinch the elongated shoots. If the flower was grown from a shank, pinch over 8-10 leaves. If from seeds - then two leaves need to be left less.
- Remove the small shoots that grow inside the bush. The middle of the flower should be free for the passage of air. If there is strong branching in the middle, air and moisture stagnate. This can lead to fungal diseases.
- If the shoots get sick, pinching will not help. They need to be cut off thoroughly, or to a healthy part. In this case, you need to capture a few centimeters of a healthy-looking area.
- You need to pinch immediately above the leaf without leaving a stick a few centimeters. This spoils the appearance of the flower.
 Pinch the elongated shoots. If the flower was grown from a shank, pinch over 8-10 leaves. If from seeds - then two leaves need to be left less.
Watch a video about pinching pelargonium:
How to form a crown?
Beginners admit that they can not regret cut green, full of life branches, albeit elongated. However, this is necessary for the formation of the bush. In order to maintain a balance between the cut and left green masses, 2-5 buds are left on each stem when pruning.
If the plant is not very extended after winter, then in exceptional cases you can leave a couple more buds. Further, when the flower sprouts young shoots after pruning, the pot periodically needs to be scrolled around its axis so that the leaves grow evenly. After a while, anyway some shoots will be larger than the rest. Will spoil the symmetry. Dont be upset. A pinch will come to help. In the fall, after flowering, you can again use pruning to remove unnecessary dried leaves and stems.
ATTENTION: Pelargonium mini can be cut quite a bit and not every year. Large shoots of zonal geraniums are shortened by more than 2/3 and leave no more than 5 stems, the rest are cut. Medium-sized bushes and royal pelargonium are cut to 1/3 of the length of the shoots.Aftercare at home
Both pinching and pruning are stressful for the plant. Therefore, after these manipulations they need special care:
- It is important to place the pots in a very bright place. Bright lighting will increase the metabolism in the leaves, and also will not allow new sprouts to stretch out. The lack of proper lighting will negate the meaning of the trimmings and pinch, as the plant will again be elongated with a small number of flowers.
- The temperature should be between + 17- +23 degrees Celsius.
- Watering should be moderate. The plant has lost a large amount of greenery, so it needs less moisture. Do not overfill the flower; roots may rot. Make sure that there is no stagnation of water in the pot. Drain any leaking water from the drip tray. Water must be used at room temperature.
- After spring pruning, you need to wait about 10 days. Next, you can start feeding. They are fed once every 2 weeks with fertilizers containing phosphorus and nitrogen. They are needed for foliage formation. With the approaching flowering phase, fertilizers need to be changed to potassium containing. More information on how to feed pelargonium can be found here.
If you recall the grandmother’s house, then on his window sills there were always tall pelargonium through the whole window. Naturally, before the care of flowers was not given much attention. But today, when there is unlimited access to Internet resources and literature, where it is explained in detail and step by step how and when everything needs to be done, it’s a sin to neglect this opportunity. Learn, grow, follow simple rules of care and enjoy healthy and beautiful pelargoniums.
Learn more about growing pelargonium and caring for it here.
Useful video
Watch a video about the correct formation of the crown of pelargonium:
Watch the video: How to Keep your Petunias Looking Full and Flowering (December 2024).


-
The benefits and harms of pomegranate juice for pregnant women - is it possible to drink a drink? Cooking and Selection Tips
The expectation of a child is a pleasant, but also an exciting stage in the life of a woman. When you need to think not only about your health, but about the proper development of the baby inside. Therefore, due attention is paid to the nutrition of the expectant mother. The easiest and cheapest way to enrich the diet with vitamins is the use of natural juices. ... -

-

-